Abstract
INTRODUCTION

Figure 1. Images of microscopic and macroscopic fungi.
|
What do all organisms in Figure 1 have in common? They are all fungi. A fungus is a eukaryotic organism belonging to the kingdom Fungi. To date, 120,000 species of fungi have been identified, but it is estimated to be higher (1.5 million), contributing to at least 18% of all species on Earth (8.7 million) (Hawksworth, 2001; Reece et al., 2014). This diverse group of organisms can be found in terrestrial and aquatic habitats around the world and plays important roles in many aspects of our daily lives (Carris et al., 2012; Webster and Weber, 2007). For example, some fungi (known as mycorrhizas) help plants absorb nutrients and water from the soil, improving the growth of the plants. Other fungi degrade the dead organic matter on the forest floor and return nutrients back to the soil, contributing to nutrient cycling. Many fungi produce chemicals that can be use in medicine and drug production. For example, Penicillium chrysogenum produces one of the most important antibiotics in the world (penicillin). Various fungi are important for producing foods such as breads, cheeses, and soy sauce. Certain fungi are associated with negative effects, causing a variety of diseases in humans, animals, and plants. In short, fungi play diverse ecological roles.
Although many people classify them as plants or animals, fungi are neither. They belong to their own category (kingdom) and have characteristics that distinguish them from plants and animals (Lovett, 2021; Webster and Weber, 2007). For example, plants are autotrophs and obtain their nutrients through photosynthesis. In contrast, fungi, like animals, are heterotrophs. In contrast to animals, fungi obtain their nutrients through the secretion of enzymes that break down molecules (external digestion) followed by their absorption, while animals ingest their food (internal digestion). Furthermore, plant cell walls are composed of cellulose, while fungal cell walls are usually composed of chitin. These diverse organisms can be unicellular or multicellular (Fig. 2). Unicellular fungi, usually yeast, grow as single cells that divide by fusion or budding (Webster and Weber, 2007). The bodies of most multicellular fungi are composed of threadlike structures called hyphae that together create a complex network of threadlike structures referred to as the mycelium (Carris et al., 2012; Webster and Weber, 2007). Reproduction of multicellular fungi can occur asexually, through the production of asexual spores, or sexually, through hyphal fusion (Webster and Weber, 2007). Despite their differences, all fungi have common characteristics, such as common habitats, and similar ecological roles.
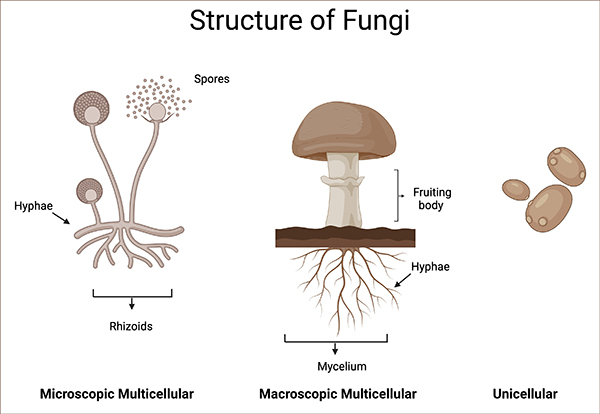
Figure 2. Different structures of fungi. (Created in BioRender).
|
The study of eukaryotic organisms is called mycology. The field of mycology is divided into several branches, including medical mycology, taxonomy, food mycology, environmental mycology, plant pathology, industrial mycology, marine mycology, and ethnomycology. A variety of educational opportunities and careers in mycology are available around the world, including, but not limited to, careers in academia, industry, and conservation ecology (Coelho, 2009).
Despite the importance of fungi in the world and the diversity of careers available in the field of mycology, educational training in mycology is rarely included in the K-12 education for underrepresented minority (URM) students. Moreover, the lack of representation and role models can cause such students to question their abilities to join the field. Hence, there is an urgent need to increase awareness of mycology. By exposing students early on to the field, we are not only increasing their knowledge regarding STEM concepts, but we can also motivate them to seek advance degrees in the field and guide them toward ways to achieve them. Moreover, fostering the implementation of mycology in K-12 systems will be vital for fostering growth of this discipline across the world.
PURPOSE
The purpose of “Micología en Ruedas" is to expose students to the basic concepts of mycology and motivate them to pursue educational training in the field.
LEARNING OBJECTIVES
- Define mycology and its importance.
- Discuss the roles of fungi in our environment and daily lives.
- Identify representative fungal organisms and their parts.
- Describe careers available in the field of mycology.
DURATION
The lesson activities are designed to be completed in two 60-min workshops.
DIRECT INSTRUCTIONS
A. Preparing for the Workshop
Instructors should purchase and prepare the materials for the activities and laboratory exercises before implementing the workshop.
B. Day 1 of the Workshop (Part 1)
- Introduction: The instructor will present the students with a short evaluation at the beginning (Pre-evaluation Form) of the workshop followed by a 20-min lecture providing an introduction to mycology.
- Development: The instructor will provide definitions of mycology and discuss where we can find fungi in our daily lives. Afterward, the instructor will walk students through the instructions for how to complete the laboratory exercise (Part 1).
- Practice: The instructor will ask students to complete the laboratory exercise, guiding and observing the students closely.
- Closure: The instructor will wrap up concepts learned by providing a graphic summary. The instructor will also be in charge of cleaning and organizing the space following the workshop.
C. Day 2 of the Workshop (Part 2)
- Introduction: No introduction will be provided for this workshop as it is a continuation of the first one.
- Development: The instructor will walk students through the instructions for how to complete the laboratory exercise (Part 2).
- Practice: The instructor will ask students to complete the laboratory exercise and laboratory report, guiding and observing the students closely.
- Closure: The instructor will provide a 15-min lecture on careers that are available in the field of mycology and what educational training is available and highlight mycologists in their country. Finally, the instructor will provide students with a short evaluation (Post-evaluation Form) and the Two Stars and a Wish form.
D. After the Workshop
The instructor should clean and organize the space following the workshop. Plates or pans should be sealed with three layers of Parafilm (Bemis Company, Inc.) and placed in zip-top bags prior disposal.
ASSESSMENT
Instructors can use the evaluations to assess what students learned from the workshop by directly comparing the students' answers in the pre-evaluation versus post-evaluation.
ABOUT THE POWERPOINT PRESENTATION
Instructors can use, modify, or adapt the PowerPoint presentation according to their needs. The PowerPoint presentation includes slides for both workshops. If no modifications are made to the lesson plan and activities, slides 1 through 15 are intended for the first workshop, and slides 16 to 27 are intended for the second workshop. The introduction provided here can be used to guide instructors in their presentations. Please provide appropriate citations when using it.
MATERIALS
- Malt extract agar or homemade plates (unflavored gelatin (2 packs), beef bouillon cubes (2 cubes), sugar, petri dish or 3.5" aluminum disposable pans with lid, a stove, water)
- Disposable lab coats
- Disposable gloves
- Lactophenol cotton blue
- Microscope slides and coverslip
- Inoculation needle
- Clear nail polish
- Sterile cotton swabs
- Parafilm
- Ziploc bags
- Alcohol burner
- 70% EtOH
- Microscopes
Handouts and presentations
PROTOCOL
Day 1 of workshop (Part 1)
-
Wipe down the counter with 70% EtOH to ensure a clean working surface.
-
Label the plate or pan with your group number, date, and initials.
-
Remove the cotton swab from the packet.
-
Select an area of the classroom to swab.
-
Write the area on the plate or pan.
-
Remember to write the area in your notes.
-
Once selected, swab the area with the cotton swab.
-
Gently streak the surface of the agar with the cotton swab.
-
Parafilm the plate or put the lid back on the pan.
-
Leave it in the designated area for 7 days.
Day 2 of workshop (Part 2)
- Wipe down the counter with 70% EtOH to ensure a working surface.
- Collect your plate from the designated area.
- Take the time to observe your plate or pan and the microbes that have grown on it. *Keep it closed while doing this.
- Draw what you observe on the sheet provided and make notes.
- Select one fungal colony that grew, and you wish to observe.
- Wait for the instructor to call you to transfer the isolate onto the microscope slide. *Instructors see
Instructor Note section.
- After the instructor has finished with the slide, add clear nail polish to the border of the coverslip and let it dry to seal the slide.
- Place the microscope slide on the microscope and adjust lenses.
- Look away!
INSTRUCTOR NOTES
1. Obtaining materials
Instructors should obtain the materials needed according to the number of students in their classroom. They should also decide if the students will be working in groups (e.g., one plate for 2-3 students) or if each student will isolate their own microbe; the plan was developed for the latter, but it can be modified according to the instructor's need. If ordering online, they should keep in mind shipping delays. Hence, it is recommended to purchase materials at least 2 months prior the activity. Instructors should also decide if they will be purchasing pre-made Malt extract agar plates (sold by Amazon or Fisher) or make homemade plates. Malt extract agar is one of the best media for culturing fungi. Nonetheless, if the media is not available it can be replaced by other (e.g., Potato dextrose agar, Sabouraud dextrose agar). For easier implementation, make a pack of materials and a folder with handouts for each student before the workshop.
2. Making homemade plates
If opting for making homemade plates instructors should do them at least 2 days prior the workshop. For this instructor will need to mix 2 cups of cold water, 14g of gelatin, 4 tsp of sugar, and 2 beef bouillon cubes. Instructors should place the mixture on medium heat until homogenous. Once homogenous, instructors should allow it to cool (~3 minutes) and pour into petri dishes or aluminum pans. Finally, instructors should let the media cool until solid in the refrigerator (this can take a few hours, but 24hrs to 48hrs is recommended). This recipe will provide ~10 plates (adapt the volume for more).
3. Workshop 1
Before starting workshop 1, instructors should provide students with handouts and materials for the activities (LessonPlan.MER.). At the start of workshop 1 instructors should provide student a brief overview of today's lesson and activities. After that, they should provide students with the pre-evaluation form (page 7-8 - LessonPlan.MER.), allow them to complete it, and proceed with the presentation (PPT.MER.). Once the presentation is done, they should walk student through the instructions on the Laboratory exercise. Finally, they should place pans or plates in a designed area and allow the isolate to grow for 7 days. To avoid loss of the handouts, instructor should collect the folder back as they will be used in the second workshop.
4. Workshop 2
At the beginning of workshop 2, instructors should ask students to collect their plate or pan from the designed storage area and provide the folder back to the students. Instructors should ask students to complete the first 3 questions of the Laboratory sheet (page 9 -LessonPlan.MER.). Once completed, they should walk student through the instructions on the Laboratory exercise (page 5-6 -LessonPlan.MER.. For the safety of students, instructors should transfer the fungi into the microscope slide as it requires an alcohol burner and lactophenol cotton blue (see instructions in point #5). If all students have a microscope allow them to place the microscope slide and look through the lenses. If the instructor only has one microscope, collect the slides form the students and display them through a projector (you can take pictures and display them, or you can connect the microscope). If no microscope is available, instructors can modify the activity by eliminating the microscopic visualization and showing pictures obtained from the internet. Instructors should ask students to complete question #4 in the Laboratory sheet (page 9 -LessonPlan.MER.). Instructor should walk students through the parts of the fungi that they are observing and how that relates to the topic discuss. Once this is done, instructors should continue with the presentation (PPT.MER.) and ask students to complete the post-evaluation form (page 7-8 - LessonPlan.MER.) and the “Two stars and a wish" evaluation (page 10 – LessonPlan.MER.); information regarding the value of the evaluations and how to implement them can be found in
Suggestions for determining student learning. Collect all handouts at the end for students' assessment, and clean and discard all materials and fungal isolates. Instructors should place petri-dishes containing fungal isolates inside a Ziplock bag, and place that bag inside a secondary bag. Microscope slides should be carefully collected by instructors and placed inside a new Ziplock bag. If biohazard waste bins are available, discard bags in there.
Table 1. Timeline and plan for each workshop.
| Workshop 1 |
| Timeline | Time | Page and Document | Plan |
Pre-evaluation
| 5-min
| Page 7-8; LessonPlan.MER.
| Instructors will provide students a pre-evaluation form to assess student learning. |
| PowerPoint lecture | 20-min | PPT.MER. | Instructors will provide a lecture introducing the concept of mycology and the role of fungi in our daily life |
| Day 1 of workshop | 35-min | Page 5-6; LessonPlan.MER. | Instructors will guide students into the hands-on laboratory exercise. Student will complete the Day 1 of workshop. |
Workshop 2 – 7 days after 1st workshop
|
| Day 2 of workshop | 40-min | Page 5-6; LessonPlan.MER. | Instructors will guide students into the hands-on laboratory exercise. Student will complete the Day 2 of workshop. |
| PowerPoint lecture | 10-min | PPT.MER. | Instructors will provide a lecture introducing careers available in the field of mycology and educational training needed for them. |
| Post-evaluation | 5-min | Page 7-8; LessonPlan.MER. | Instructors will provide students a pre-evaluation form to assess student learning. |
| “Two-stars and a wish" form | 5-min | Page 10; LessonPlan.MER. | Instructors will provide students this form to assess students' attitude towards the lesson.
|
5. Preparing the microscope slide
- Prepare an area in the counter and wipe it down.
- Add alcohol to the bottom of the burner, put the lid on, and seal it.
- Take a lighter and turn on the match.
- Open the students' plate or pan close to the burner (avoid contamination of the plate).
- Take the inoculation needle and flame it. Wait for it to cool down (~1 min).
- Take a fragment of the fungal mycelium with the inoculation needle (It is probable that the plates contain multiple contaminants. Make sure your students selected a fungal isolate).
- Close the plate or put lid on pan.
- Place the inoculation needle on the drop of lactophenol cotton blue in the microscope slide and gently move the loop in circular motions.
- Place the microscope cover slip on top of the drop of lactophenol blue.
- Re-flame the inoculation needle.
- Return the microscope slide to the students.
SUGGESTIONS FOR DETERMINING STUDENT LEARNING
Content knowledge
Instructors can assess content knowledge by implementing the pre- and post-evaluation forms as stated in the “Instructors' note" section. The pre-evaluation and post-evaluation form consists of 7 questions: 4 focused on general questions about mycology (Question #1-4), 1 focused on previous knowledge about mycology (Question #5), and 2 focused on their interests in the field (Question #6-7). For the assessment only questions 1-4 should be counted; each question can be worth 1 point for a total of 4 points. Assessment of student knowledge and learning can be made by comparing pre- and post-evaluations of each student. Instructors should adapt these questions to the level of knowledge of their students.
Course attitudes
To measure student attitudes towards the course instructors can implement the “Two stars & a wish" form. Students are asked to state two things they liked (2 stars) and one thing they would change (1 wish) about the program. Instructors can then use a thematic analysis and classify responses into main themes (e.g. 6 students said that they wished the workshop was longer; theme = longer-time frame of workshop). This practice can inform instructors of student's interest and motivation towards the lesson plan and identify areas of improvement for future implementations.
POTENTIAL ADAPTATION
Instructors should adapt the lesson plan according to the student's background and prior knowledge. Suggestions for assessing student learning and the material associated to it are provided. Nonetheless, instructors can opt to implement the assessments and evaluations they seem fit. This lesson plan is targeted for K-12 education with a focus on 8th to 12th grade. However, it can be adapted as an introductory laboratory activity for undergraduate student or outreach education. If the instructor does not have a microscope available, Foldscope classroom kits can be a great alternative (https://foldscope.com/). Because this are paper microscopes, it is not recommended the use of microscope slides with lactophenol cotton blue for the safety of the students. Instead, foldscope contains pre-made microscope slides that can be used for visualization with the kits (Foldscope Prepared Slide Box Set #3 Microanimals (https://foldscope.com/collections/all). If opting for the use of Foldscope, steps for “Day 2 of workshop" can be omitted. Instead, instructors can focus on foldscope assembly (https://www.youtube.com/watch?v=L-tFJRGQBIo&t=2s) and pre-made slide observation. To facilitate the adaptation of the lesson plan and increase accessible education in diverse areas (US, Latin America, and beyond), open access to all educational materials is provided in Spanish- and English-language.
REFERENCES
Carris, L. M., Little, C.
R., & Stiles, C. M. (2012). The Introduction to fungi. The Plant Health Instructor. DOI: 10.1094/PHI-I-2012-0426-01
Coelho, S. (2009). Fun with fungi: mycology careers. Science. DOI: 10.1126/science.caredit.a0900084
Davis, A. L. (2013). Using instructional design principles to develop effective information literacy instruction: The ADDIE model.
College & Research Libraries News,
74, 205-207.
Dewey, J. (1938).
Experience and education. Collier Books.
Hawksworth, D.L. (2001). The magnitude of fungal diversity: the 1.5 million species estimate revisited. Mycological Research 105:1422-1432.
Lovett, B. (2021).
Three reasons fungi are not plants. American Society of Micorbiology.
https://asm.org/Articles/2021/January/Three-Reasons-Fungi-Are-Not-Plants
Reece, J. B., Urry, L. A., Cain, M. L., Wasserman, S. A., Minorsky, P. V., & Jackson, R. B. (2014).
Campbell biology (No. s 1309). Boston: Pearson.
Webster, J., & Weber, R. (2007).
Introduction to Fungi. Cambridge University Press, Cambridge, UK.