Introduction
This experiment will teach students how to prepare and load an electrophoresis gel. They will then run the gels in an electrophoresis system to separate several dyes that are of different molecular sizes and carry different charges.
This technique is fundamental to many of the procedures used in biotechnology.
Objectives
- Understand how gel electrophoresis is able to separate molecules.
- Learn how to use a micropipet to load a gel.
- Review safety considerations when working with an electric current.
- Determine the components of an unknown dye mixture.
Materials
- Samples of the following dyes:
- 0.25% Bromophenol blue
- 0.25% Janus green
- 1.00% Orange G
- 0.25% Safranin O
- 0.25% Xylene cyanol
- 0.25% Unknown mixture
- Microtube rack
- Electrophoresis gel box and power supply
- 1 gel tray with 6-8 tooth comb
- 250-ml beaker or graduated cylinder
- 20-μl micropipette with tips
- Gloves
- Paper to cover lab bench
- 60°C water bath or microwave oven
- 0.7% agarose solution (enough for 35 ml per gel)
- Container with TBE buffer (1X)
- Plastic bag for disposal of waste
- Distilled water
Advance Preparation
Make the 0.7% agarose gel solution as follows:
To make 100 ml of gel, which is sufficient for 3 gels, weigh out 0.7 g of agarose and place into a 200- to 250-ml glass beaker or flask. Add 100 ml of 1X TBE (Tris-Borate-EDTA) buffer. Heat in the microwave for 30 seconds at a time, shaking gently each time, until the agarose is completely melted. Alternatively, the solution can be heated on a hot plate, with occasional gentle shaking, until the agarose is melted. Keep warm if the class will use it within a half hour. Otherwise, allow the solution to cool and solidify. Cover and keep in the refrigerator.
Day of class:
Loosen the lid from the container of 0.7% agarose. Immerse the bottle in a distilled hot water bath to melt the liquid. Alternatively, melt the agarose in a microwave and then keep warm in a hot water bath. Do this step well ahead of time and keep the agarose warm until needed by the students. Students will need to handle the bottles so have potholders available.
After the lab, the TBE buffer solution may be poured back into the container and reused for the Restriction Digest Laboratory.
Information for the teacher
Using a Micropipet
A micropipet is a very delicate, expensive instrument that is used to dispense an extremely precise and very small volume. It is important to know the volume limits of the micropipet that you are using and to never dial either lower or higher than these limits. The volume settings on the micropipet are generally read from the top to the bottom of the number dials. Often the numbers before the decimal place will be in a different color to those that come after it. For example, on a 200-µl micropipet a volume set at 63.5 µl might have the 6 and the 3 in black lettering but the 5 might be in red lettering.
The micropipet is designed to be held in one hand. Set the micropipet to the desired volume by turning the volume adjustment knob. Using a 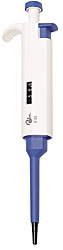 disposable tip that is the correct size for the micropipet push the shaft of the micropipet firmly down into the sleeve of the tip until a firm seal is made.
To aspirate (pull in) the liquid, first depress the plunger to the first stop, place vertically into the liquid to a depth of about 2-3 mm and slowly release the plunger until it returns to its up position. Now you can move the micropipet out of the liquid and over to the agarose gel well or other vessel.
Place the tip against the wall of the well or other surface and begin to slowly depress the plunger, but this time you must move the plunger all the way to the second stop in order to expel all the liquid.
While still holding the plunger in the depressed position, move it out of the well or other vessel and then allow the plunger to return to its normal position. If the plunger is released while it is still in the well it will aspirate the liquid that you just deposited there!
Discard the tip into an appropriate waste container by pressing the ejector button which is found near the top of the micropipet. Always use a fresh tip for each sample to avoid cross contamination of the samples.
Buffer Solution:
Tris/Borate/EDTA (TBE) buffer is commonly used in electrophoresis systems. This salt solution conducts the electric current and controls the pH of the solution during separation of DNA fragments, or in this case, dye molecules. Dilute the stock solution as necessary with distilled water to make a 1X solution.
Distilled Water:
Minerals in regular tap water will quickly stain equipment. Please rinse and air dry both the gel trays and gel boxes in distilled water. Be careful not to dislodge the wiring at the base of the gel box during this process.
Gel Disposal:
When lab is complete, collect all gels in the plastic bags and dispose of in trash.
Use of Power Supplies
The power supply produces a voltage that is high enough to cause severe electrical shock if handled improperly.
- Do NOT plug power supply into wall receptacle until the safety cover is positioned on the cell and all other electrical connections are properly made.
- This unit uses a 3-wire grounded plug. For safety reasons, it should NOT be used with 2-wire receptacle with a conversion plug.
- Do not operate in a damp or humid environment; any condensed moisture may short out electrical components. Make sure that all electrical equipment is dry.
- Inspect all power cords, patch cords, banana jacks and plugs for any defects, such as cracked and dried-out insulation and loose or wobbly banana jacks or plugs.
- Do not come in personal contact with or allow metal or any conductive material to come in contact with reservoir buffer or the electrophoretic cell while power supply is on.
- The power supply may continue to produce some voltage even when the power has been turned off. To eliminate any risk associated with this event, follow all required steps given in the procedure. When disconnecting the gel box, be sure that the leads do not touch each other, come in contact with the buffer solution, or otherwise create any hazardous electrical condition.
Notes
Agarose is a substance derived from seaweed that forms a jelly-like matrix when dissolved in liquid. During electrophoresis an electric current is created through the agarose and molecular fragments can move through the agarose between the two electrodes.
The size of the pores in the gel and the size of the fragment trying to move will determine the rate at which each fragment progresses. The direction in which a fragment moves is determined by the charge that the fragment carries.
When using this protocol the granular dyes should be made up in the following concentrations:
For all except Orange G use 25 mg of dye, add either 10 ml of 60% glycerol solution or 4 g of sugar and make up to 10 ml with distilled water.
For Orange G use 100 mg of dye and make up as above. The Orange G is only 50 bp in size and is easily run off the end of the gel. It runs far ahead of the Bromophenol blue which is the easiest dye to see.
For the liquid dyes, if necessary, dilute with the 60% glycerol solution to the required dilution.
Student Activity - Gel Electrophoresis of Dyes

In this experiment you will be using electrophoresis to separate dye samples which have different sizes and charges.
Precautions
STUDENTS: Check with your teacher to be sure that you understand all of the safety instructions for using this equipment.
Objectives
- Understand how gel electrophoresis is able to separate molecules.
- Learn how to use a micropipette to load a gel.
- Review safety considerations when working with an electric current.
- Determine the components of an unknown dye mixture.
Procedure
- Put on gloves. You may be sharing dye samples and the agarose gel with another lab group.
- Seal each end of the gel tray with laboratory tape. Place the plastic comb into the middle of the tray. Go to the hot water bath and get the bottle of melted agarose.
- Carefully pour the agarose into the gel tray until it is approximately 1/3 of the way up the teeth of the comb. This should use about 30 ml of agarose solution. Make sure that there are no bubbles in the gel.
- Let the gel harden without disturbing it for about 10 minutes.
- Carefully remove the comb from the gel by pulling straight out of the solidified gel. Remove the tape from the ends of the gel tray.
- Place gel into electrophoresis unit. Add 150 ml 1X TBE buffer to completely fill the box and to cover the top gel surface with about 2 mm of buffer.
- Note: At this point the gel box can be covered and left until the next day if necessary.
- On the gel load 5-10 µl of each dye into a well. Keep track of which dye goes into which well on a notebook sheet. Use a new tip for each dye and be careful not to puncture the bottom of the well. Dyes to be used:
- Bromophenol blue
- Janus green
- Orange G
- Safranin O
- Xylene cyanol
- Mixtures of any of the above dyes as provided by the teacher
- Thoroughly clean up any spilled buffer or any other liquid surrounding the gel box.
- Make sure that the power supply is unplugged and switched off before proceeding.
- Carefully place the lid on the gel box and connect the terminals correctly.
- Plug in the power supply, select the 100V option and turn on the machine. The run light will illuminate, signifying that power is running to the cell.
- Observe the tiny bubbles that form along the platinum electrodes.
- Let the gel run undisturbed for about 30 minutes but check frequently to determine that the dyes will not run off the end of the gel into the buffer compartment.
- When the dyes reach approximately 1 cm from the end of the gel, turn off the power supply. Then disconnect the patch cords from the power supply and unplug the unit.
- Make sure that your gloves are on. The gel will be removed from the box for you to record your observations on the activity sheet.
- Complete the activity sheet.
Clean up
Discard all pipette tips and gels into plastic bags that can then be placed in the regular trash. The gel box, tray and comb should be rinsed in distilled water as outlined above and then allowed to air dry. Be very careful not to damage the tiny electrode wires at each end of the gel box.
Wash your hands thoroughly and clean the area where you were working.
Student Activity
- Why is the comb placed in the center for this electrophoresis experiment?
- The diagram below represents your gel. Using colored pencils or markers draw in the results of your dye separation. Be sure to label each lane with name of the dye that was in the well.

- Which dye likely contained the smallest molecule?
- How do we know this?
- List the dyes that have a negative charge.
- Explain why you chose these dyes.
- If you were pouring a gel to run DNA through, where would you place the comb? Explain your answer.
Answers to Student Activity
- The comb is in the center of the gel since the dyes used have either positive or negative charges and can therefore migrate in different directions.
- The smallest molecule is orange G.
- It travels the greatest distance in the gel
- The dyes with negative charge are bromophenol blue, orange G and xylene cyanol.
- We know this because they move towards the positive electrode.
- The comb would be placed near the end of the gel since DNA has a negative charge and will migrate towards the positive electrode only.
Adapted from:
http://ceprap.ucdavis.edu/Equipment/Protocols/gel_electrophoresis_of_dyes_03.pdf
General information can be found at:
http://ceprap.ucdavis.edu/acrobat/electrophoresis.pdf
To build your own electrophoresis chamber see:
http://www.accessexcellence.org/AE/AEPC/WWC/1993/moving.html