Cantonwine, Emily G. 2014. An Active Learning Lab on a Selection of Ascomycete Reproductive Structures and their use in Disease Diagnosis. The Plant Health Instructor. 10.1094/PHI-T-2014-1223-01
Learning Outcomes
- Students will be able to identify common reproductive structures of ascomycetes and label important parts of these structures from cross sections of tissues on prepared slides.
- Students will be able to distinguish sexual and asexual reproductive structures of ascomycetes from prepared slides or squash mount slides.
- Students will be able to make relevant macroscopic and microscopic observations of signs and symptoms for diagnosis of plant diseases with the help of Disease Compendia or other relevant resources.
Introduction
In today’s lab you will identify some common ascomycete reproductive structures from prepared slides and practice using terminology related to these structures to gain a better understanding of their similarities and differences (Task 1). You will also connect your 2D understanding of these structures from the cross section view (typical of most prepared slides and diagrams) to the real world of 3D by studying reproductive structures from culture (Task 2) and plant disease samples (Task 3a). In Tasks 3b and 3c, you will apply these new observational skills while you work through a typical process of disease diagnosis. This process will require close study of disease and pathogen descriptions, so be prepared to do some reading near the end of lab.
Most of the content relevant to today’s lab has already been introduced in lecture or in a previous lab. You should refer to your notes and textbook to refresh your memory of this content as you proceed through today’s lab. New content or skills required to complete this lab will be presented by your instructor at the beginning of lab. Take notes so you may refer back to this material as needed. See Instructor’s Note #1
Procedure
Instructions. Begin with Task 1 and move through the tasks in the order they are presented. Once all students have completed Tasks 1 and 2, the answers to these Tasks will be reviewed and discussed with the class. Answers to Task 3 will be reviewed one-on-one for students who finish early, and near the end of lab for the rest of the class.
Task 1: A selection of slides is provided with different reproductive structures of ascomycete plant pathogens. Your job is to determine what type of structure each slide presents; a list is provided on the board. Draw and label all important components (e.g. conidia, conidiophores, ascus, etc), and identify whether the slide presents an asexual or sexual phase of the fungus. See Instructor’s Note #2
Task 2: Prepare a squash mount of the flask-shaped fruiting bodies in the culture provided. Are the fruiting bodies pycnidia or perithecia? How can you tell? See Instructor’s Note #3
Task 3: Now it is time to test your observation skills with diseased samples. Complete each part in the order they are presented.
- Part A – Use a dissecting microscope to determine the type of reproductive structure present on each diseased plant sample. To help, a list of the types of structures present among the samples and frequency of each are provided at this station. Write your guesses in Table 1, and then check the answer sheet and write the correct answers in the table. If you were correct, explain how you were able to distinguish the structures so you can do it again. If you missed one or more, observe the samples again to see why you were confused, and then make notes to help you identify the structures correctly next time. See Instructor’s Note #4
Table 1. Reproductive structures of ascomycetes from diseased plant samples (Task 3a).
|
Host |
Guessed structure |
Correct structure |
Comments |
|
|
|
|
|
|
|
|
|
|
|
|
|
|
|
|
|
|
|
|
|
|
|
|
|
|
|
|
|
|
- Part B – Two plant diseases (A and B) are shown in Figures 1-5. One is early leaf spot of peanut and the other is late leaf spot of peanut. Your job is to match the disease letter to the leaf spot disease. To do this, refer to the Compendium of Peanut Diseases to fill in the first 3 rows of Table 2 for both diseases. Your descriptions should be as detailed as possible because this is the information you will need to make the match. Next, closely observe the diseases shown in the figures, and then record your deductions in the fourth column. When you are ready, ask to see the spore photographs from each unknown disease to confirm the correct answer.
Note: You will be working through the steps that a diagnostician might use to identify the cause of two similar diseases. In the real world, there are no answer sheets. Instead, observations of reproductive structures or spores are often the final diagnostic step to identify the disease or pathogen. See Instructor’s Note #5
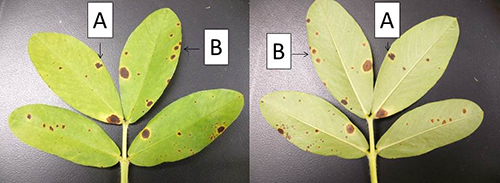
Figure 1. |
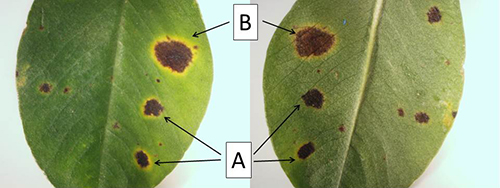
Figure 2. |
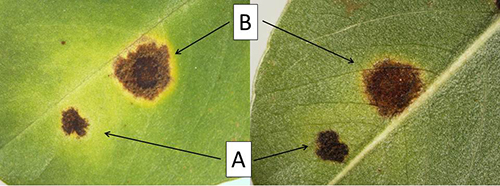
Figure 3. |
 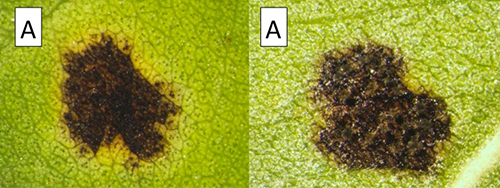
Figure 4. |
|
 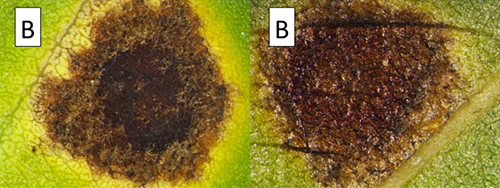
Figure 5.
|
Table 2. Steps to distinguish early and late leaf spot of peanut (Task 3b).
|
|
Early leaf spot |
Late leaf spot |
|
Pathogen
|
|
|
|
Detailed description of symptoms
|
|
|
|
Detailed description
of signs
|
|
|
|
Disease guess
(A or B)
|
|
|
|
Correct Answer based on observations of spores
(A or B)
|
|
|
- Part C – For each disease sample provided at this station, try to determine which disease is present. Compare the signs and symptoms that can be observed with the naked eye or dissecting scope to those of diseases described in the corresponding compendium (or other host-specific reference). When you think you know what it is, write the disease name and the microscopic signs (spores and/or reproductive structure) that you would expect to see for that pathogen in Table 3. Drawings are acceptable. Next observe the slides prepared by your instructor to see if the microscopic signs on the slide match those that you expected. If the signs are as expected, congratulations. If the slides do not look as expected, describe what you do see and go back to the reference to see if you can match the sign to the pathogen.
Note: This activity walks you through the steps that a diagnostician might use to identify diseased samples that he or she does not immediately recognize. Although this process is very similar to the previous activity (Part B), the pool of possibilities is greater, and closer study of your resource is usually required. See Instructor’s Note #6
Table 3. Information needed to identify plant diseases using observations and diagnostic resources (Task 3c).
|
Host |
Deduced disease using dissecting microscope |
Expected microscopic
sign(s) |
Actual microscopic
sign(s) |
Actual disease |
|
|
|
|
|
|
|
|
|
|
|
|
|
|
|
|
|
|
|
|
|
|
|
|
Useful References
Cantonwine, E.G. 2014. Creating an active learning environment in the laboratory with prepared slides. The Plant Health Instructor. Online DOI: 10.1094/PHI-T-2014-1222-01.
Carris, L.M., C.R. Little, and C.M. Stiles. 2012. Introduction to Fungi. The Plant Health Instructor. Online DOI:10.1094/PHI-I-2012-0426-01.
Shokes, F.M and Culbreath, A.K. 1997. Early and late leaf spots. Pages 17-20 in Compendium of Peanut Diseases, 2nd Ed. APS Press, St. Paul, MN.
Schumann, G.L. and D’Arcy, C.J. 2010. Essential Plant Pathology, Second Ed. APS Press, St. Paul, MN.
Instructor Notes
INTRUCTOR’S NOTE #1 – This lab focuses on common sexual and asexual reproductive structures of ascomycetes, with an emphasis on enclosed fruiting structures. It is the second of four fungal labs in my plant pathology course. The first fungal lab covers zygomycetes and hyphomycete ascomycetes, the third is dedicated to basidiomycetes, and the fourth focuses on oomycetes, comparing them to easily confused true fungi. A comprehensive lab practical, covering all groups of plant pathogens, is given near midterm, which helps to encourage students to make good observations during each lab.
This lab is designed to be an active learning lab. See the recent teaching article by Cantonwine for more information about implementing active learning activities. Due to this approach, there is arguably less emphasis on reviewing all content related to the subject, and more emphasis on engaging the student with a selection of the content in a meaningful way. The activities can easily be modified to fit your learning objectives if more content and less application are desired.
Related to this, there are additional learning outcomes that I do not share with my students, but believe to be as important as those that are listed in the lab.
- Students will be able to use their notes and textbook to find answers to their content questions.
- Students will be able to analyze and apply content knowledge to solve problems.
The former outcome is not formally assessed, but the latter outcome, as well as those listed for the students, is assessed on the lab practical and, in some cases, also on a lecture exam.
The Introduction section is deliberately sparse to reinforce the expectation that students will need to use other resources (i.e., their notes or textbook) to complete the lab. My lab notes follow Schumann and D’Arcy (2010) closely. The Ascomycota section from Carris et al. (2012), which includes hyperlinks to the Illustrated Glossary of Plant Pathology at APSnet, is another ideal source if additional background information related to this laboratory is desired.
INSTRUCTOR’S NOTE #2 – The slides I use in Task 1 are listed in Table A. These slides were selected because they are the best examples, (high quality with little distortion), of sexual and asexual structures within my teaching collection. I do not list the structures in Task 1 in case others prefer to use different slides. The list of structures that I provide to the students corresponds to the last column of Table A. Although there are two slides for chasmdothecium, I only list this structure on the board once.
For this exercise to work, you will need to tape a small numbered card over the information label of each slide so that students cannot see this information. Students should use their lecture notes, textbook, and confer with each other to identify the structures.
Most of the slides are cross sections of leaves, and many students may not remember basic leaf anatomy. I hang a leaf anatomy banner in the lab to help, and provide slides of comparable healthy tissues upon request.
Table A - List of prepared slides used in Task 1.
|
Slide Information |
Slide No. , Supply Company |
Reproductive structure type |
|
Monilinia fructicola: apothecium |
3-42b, Triarch |
apothecium |
|
Venturia inaequalis: ascocarp,
median l.s. |
3-48b, Triarch |
psuedothecium |
|
Blumeria graminis: chasmothecia (formerly Erysiphe graminis: cleistothecia) |
3-27, Triarch |
chasmothecium |
|
Colletotrichum lindemuthianum, conidial lesions, sec. |
3-70, Triarch |
acervulus |
|
Septoria apii: pycnidia |
3-80, Triarch |
pycnidium |
|
Blumeria graminis: conidia (formerly Erysiphe graminis: conidia sec.) |
3-26, Triarch |
exposed conidiophore |
|
Monolinia fructicola: conidia |
3-42a, Triarch |
sporodochium |
|
Phyllactnia alnicola: chasmothecia (formerly Microsphaera alni cleistothecia) |
B 249, Carolina Biological |
chasmothecium |
INSTRUCTOR’S NOTE #3 – I use Sordaria fimicola for this activity. Cultures may be purchased from Carolina Biological Supply (Item # 155858). I limit the answer options to perithecium or pycnidium because otherwise the task is too challenging for introductory students. I am always surprised by how many students struggle to apply their knowledge from Task 1 to this Task. The activity also provides an example of what a flask-shaped structure looks like when not sectioned, which will be useful for Task 3. My students learned squash mount slide preparation in a previous lab. If you have not covered this yet, provide instruction at the beginning of lab.
INSTRUCTOR’S NOTE #4 – This is a very challenging task because the only non-sectioned fruiting body my students have observed before this point is the perithecium from Task 2. To help make this task easier, I recommend that you tell your students exactly how many examples of each fruiting body type there are. I write this information on the other side of the answer sheet, and tape the paper to the station table with the answer side facing down.
I use diseased samples that I collect from nature or receive from the University of Georgia Plant Disease Diagnostic Lab in Tifton, GA; therefore, your list of samples will likely differ from mine. Diseases that I can usually find in my area during the early fall are provided in Table B.
Table B – A list of the plant disease samples commonly collected during the fall in Georgia for use in Task 3 (A to C).
|
Disease |
Reproductive structure type |
|
Early leaf spot of Peanut |
Sporodochium |
|
Late leaf spot of Peanut |
Sporodochium |
|
Entomosporium leaf spot of Indian Hawthorn |
Acervulus |
|
Anthracnose of Liriope |
Acervulus |
|
Septoria leaf spot of Blueberry |
Pycnidium |
|
Powdery mildew of oak (dried sample) |
Chasmothecium |
INSTRUCTOR’S NOTE #5 – I have selected early leaf spot and late leaf spot of peanut for this task because their signs and symptoms are so similar and close reading of the compendium is required to figure out how to tell one from the other. In fact, this activity is mostly designed to walk students through the process of how to use the compendium (the third learning outcome listed in the lab), which I want them to apply further in Task 3c. Figure A should be provided to students only after they have made their determinations based on their observations of Figures 1 to 5. Students are expected to match the spores from Figure A to the descriptions and diagrams of the spores in the compendium to find the correct answer. The spore sizes are quite different, so this matching exercise is very easy. Disease A is Cercosporidium personatum and Disease B is Cercospora arachidicola.
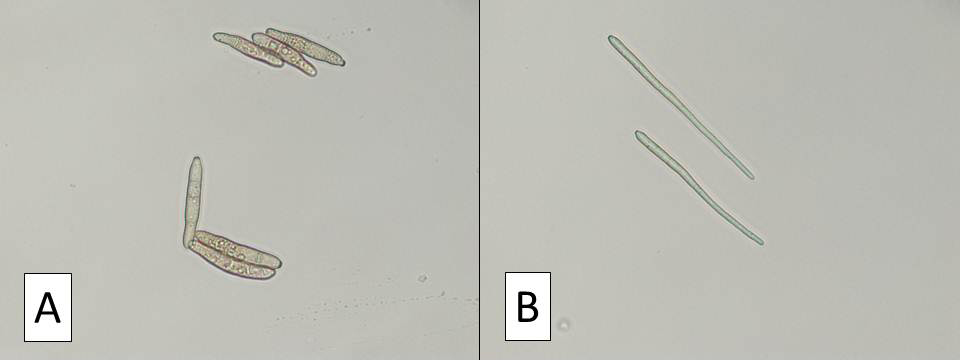
Figure A.
INSTRUCTOR’S NOTE #6 – The same diseases provided in Task 3a may be used in this task, minus any used in 3b. I prepare the spore or fruiting body slides up to 24 hours ahead and seal with transparent nail polish (Sally Hansen’s “Hard as Nails”). If students struggle with this task, remove any disease samples that are difficult to identify, and limit the list of possible diseases, so that the task is more similar to Task 3b. This task was designed to use Disease Compendia, but any publications that review common diseases of the host may be substituted as long as the disease provided is included.
As mentioned in the note section of Task 3C, this activity is designed to walk students through the process a diagnostician might use to diagnose diseased samples that he or she does not immediately recognize. The sequence of steps in this task reflects the sequence that I tend to use. If you prefer a different sequence (i.e. observing the microscopic signs prior to searching the diagnostic resources), consider modifying the task and corresponding table to better match your preference.